
Sparks
With Master Sparky Electrical
Collaboration Project
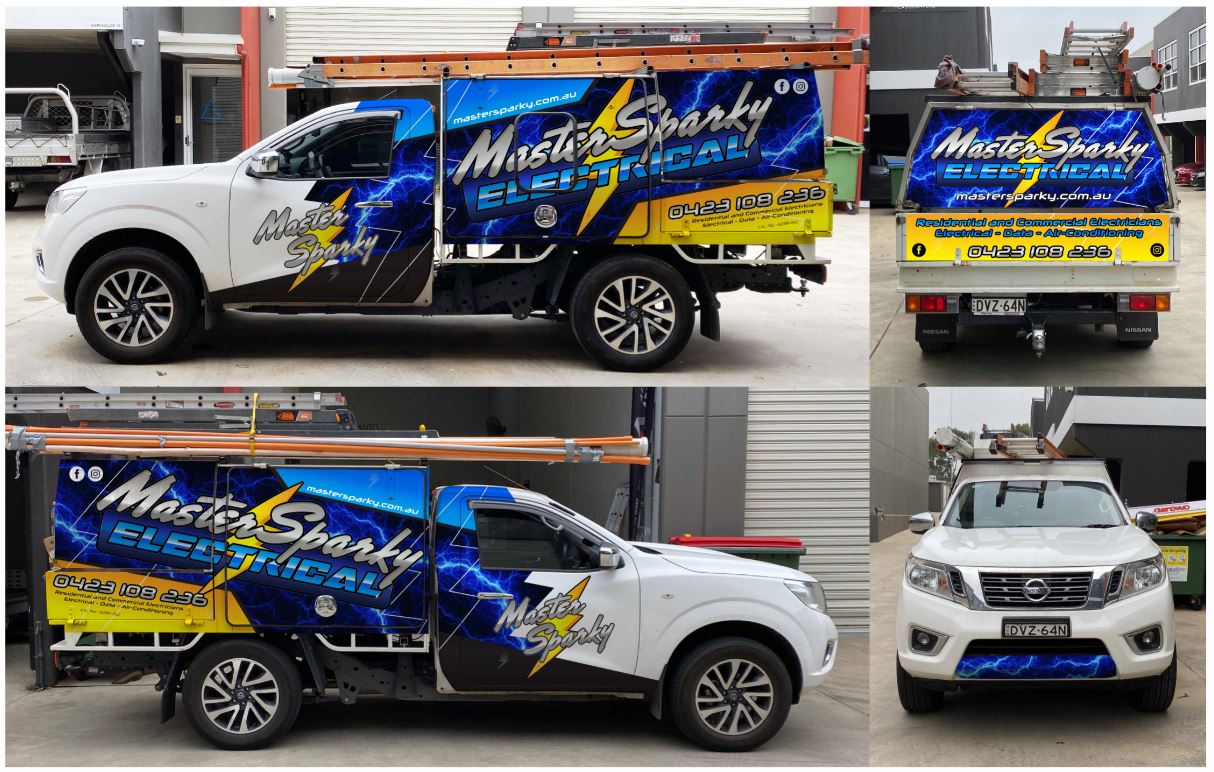
Car: Nissan Navara
Goal: Bring this simple white work ute to life and make it attract some serious attention.


Where do we start?
It’s not often where you get a customer who literally says “do your thing, I trust you” and walks away from the discussion, knowing well that you will make the design stunning.
Actually, we do get these situations quite a fair bit, however, it often takes a lot of planning and going back and forth with the customer. It’s normally not this efficient, that’s what makes this different.
First design was spot on, we only needed to make minor adjustments and we were ready for print!
Background of Customer
Master Sparky Electrical is a western Sydney business based in Glenmore Park. They are a small business looking to move up in the electrician world. Currently their fleet consists of 1 work ute.
You can find their website here, and instagram portfolio here.
Their aspirations are to grow in capacity so they can have a total of 3 utes with formal company branding across all vehicles, by the end of the year.
Everyone has a budget,
Every good business needs to stand out.
This is where we shine at Auto Artisan.
We needed to spend time on a striking design, but not only that, we also needed to re-vamp the company logo and bring it into the era of 2020.
How can we achieve a minor re-brand, complex design and cover an entire ute, whilst keeping the costs reasonable??
Well, there is always a way and we found it.
Re-vamping the logo
The logo of Master Sparky Electrical has been used on many of the company branded items, it’s on every item of clothing, note pads, business cards and more.
We needed a way of refreshing this logo but still keeping majority of the visual cues to be very similar. This would allow the company to continue using the existing material, until it is finished or worn/ready for replacement. It’s just another way, we can help you have a ‘fresh look’ with out a complete re-brand.
Here is what we came up with,
Keep the lightning strike central and original as your eye is drawn straight to this spot. Remove the outlines and bordered boxes, this belongs in 1990. Change the font, make it more up-beat and keep it a clean white.
Here is the final result.
Creative Pathways
We all know what lightning looks like, don’t we? Well, it doesnt matter, we placed a sample photo for you to see. We all love a good visual!
It was now time to blend the new logo background colours to suit the lightning and carry out elements of the logo within the entire design and the out line shape of the design.
Oh, and more thing. did we mention this entire wrap is to be reflective???
That’s right, at night, when the lights hit this design, the lightning will strike and lead you to the Master Sparky logo and phone number.

Design Process
Here is where it get’s tricky, if we can refer you back to the original photo of the car, you will notice the entire rear section is full of separated sections, cross bars and tool boxes.
So, we had to start this entire design process based on the size and location of a prominent logo.
Once the logo was placed in the right spot, it was absolutely vital that the lines and design carried over to hide all the separated sections.
The customer’s vehicle had a cage on it, you will notice this cage was blocked out in the design. As we are typing this, the customer is in the process of removing the caged sections and replacing them with enclosed panels.

Fast Forward to Designs
Normally, you would see the designs printed on paper. This time we decided to upload the images directly from the digital render. We wanted you to see, exactly how close we can get with digital render to real life application.
Check out the images below, don’t they look extremely real??
Materials and supplies
For this project, we wanted to use Arlon Illuminite wrapping film. In past projects, we have used this product and to be perfectly honest, Illuminite by Arlon Graphics provides the whitest ‘white’ during reflections. So, we reached out to Graphic Art Mart, one of our supplier partners to get the ball rolling.
Installation Photos
From our entire team, we only needed 1 strong member of our team for this project, this was Scott. From start to finish, he took on the entire project and completed the full installation within 1 day. The next day, we held the car and we performed quality control checks with our team leader, Chris. This is a standard process for every large scale wrap project we undertake.
We observed the edges then post heated them one more time to ensure all of the “disobedient” sections “relax” and mould better to the vehicles shape.
Install Complete!
The next lot of photos show the difference with the flash on and off, this is much the same when you are driving at night and your headlights reflect off street signs and emergency vehicles.
NOTE: The difference is subtle but good during the shift from day into night… However, just wait until we show you the actual night photos!
That last photo was a little sneak peak…
Prepping for the photo shoot
The prep for the photo shoot was straight forward, we needed some key items.
- Our Master Sparky Electrical vehicle
- Our location
- The model Naz Bright
- Pre-printed Vinyl to wrap the model
- Transitioning photo shoots from day time to night time!
Wrapping the Model
Just like our last lot of projects, we acquired out model Naz Bright.
She organized hair and make up by Sara of @sohairandmakeup – you can find her on Instagram and Facebook! We have worked with her for a few projects and she always does great work.
It was time to start wrapping Naz. This time we ran into 2 issues though!
- MOZZIES! &
- THE WRAP WOULDN’T STICK!

Honey to the rescue!
This was a funny one, just as normal, females love to take care of themselves.
Naz, had placed moisturising cream on her legs, which of course meant nothing would stick to them… including the lightning wrap!
She took the cream off as much as possible but it still didn’t work for us… So, we got our hands on some honey! Used dabs of honey on her legs with the vinyl installation and walla! It stuck down, temporarily.


Next, it was time to collaborate all of the photos and create the final design. We wanted to present 2 photos for this project, for different purposes.
The first one, representing our artistic side which doesn’t necessarily show off the vehicle.
The second one was definitely all about the vehicle!
Check out the final edits, just below!

")